If you’re advertising online and not using Google Tag Manager to help measure your results, our only question is… Why not? The answer we hear most often is that ‘it’s too complicated’ or even more concerning, ‘what is Google Tag Manager?’
If these are questions that you’re asking yourself and you have been putting off setting it up because of them, then this beginner’s guide will help answer some of your pressing questions.
What is Google Tag Manager?
Google Tag Manager gives you the ability to add and update your own tags to your websites and apps for conversion tracking, site analytics, remarketing and more. You can track conversions through Google Analytics, however, Google Tag Manager helps to make this process more efficient and gives you more control and freedom to select what exactly you are tracking. Best of all? Google Tag Manager is a completely free tool for you to utilise within your digital strategy.
There are three main elements to Google Tag Manager:
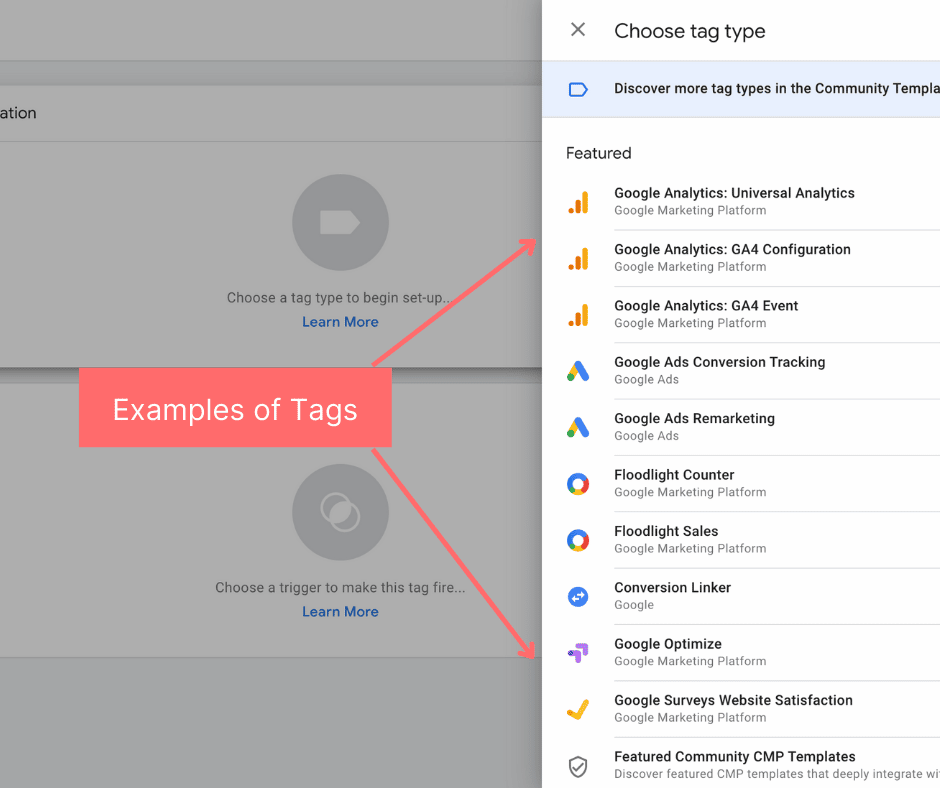
Tags
A ‘Tag’ is a code embedded in your website’s javascript to extract certain information. These codes will then send data to a system such as Google Analytics. Tag’s fire in response to events which can include things like form submissions, link clicks, or page loads. Each tag can be set to track something different for example you could create a tag to track how many people fill out a contact us form on your website. That tag will then send more accurate information to Google Ad’s, Google Analytics or another third party site.
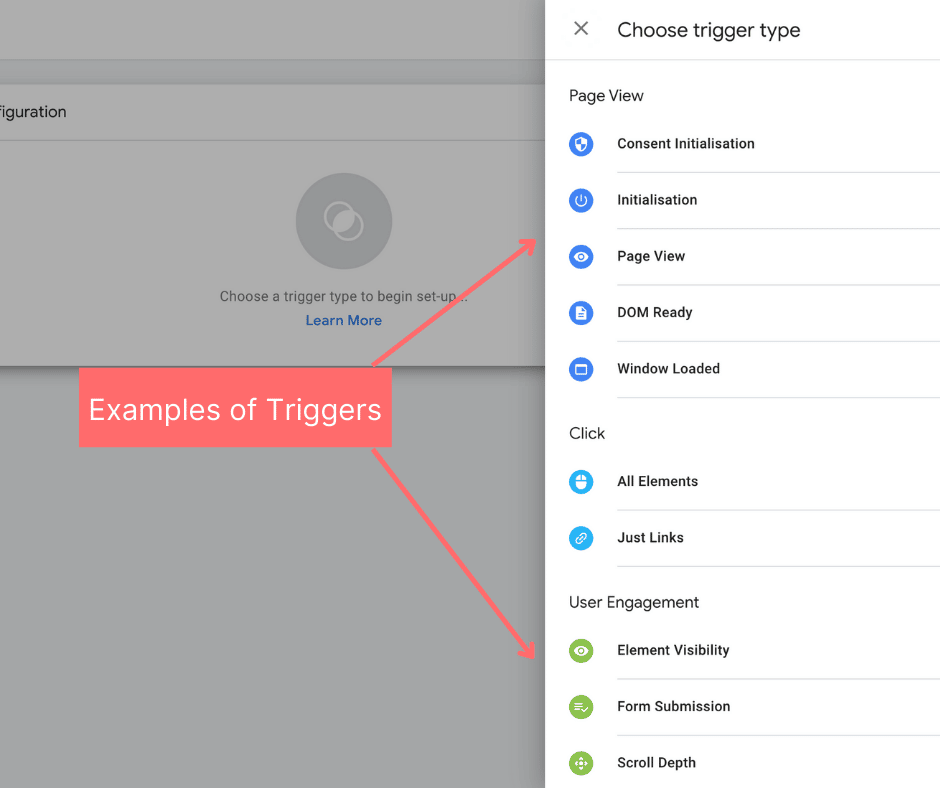
Triggers
A ‘Trigger’ communicates to Google Tag Manager when, where or how to fire a tag. It will listen for the certain events that you have set up such as form submissions, clicks or page loads.
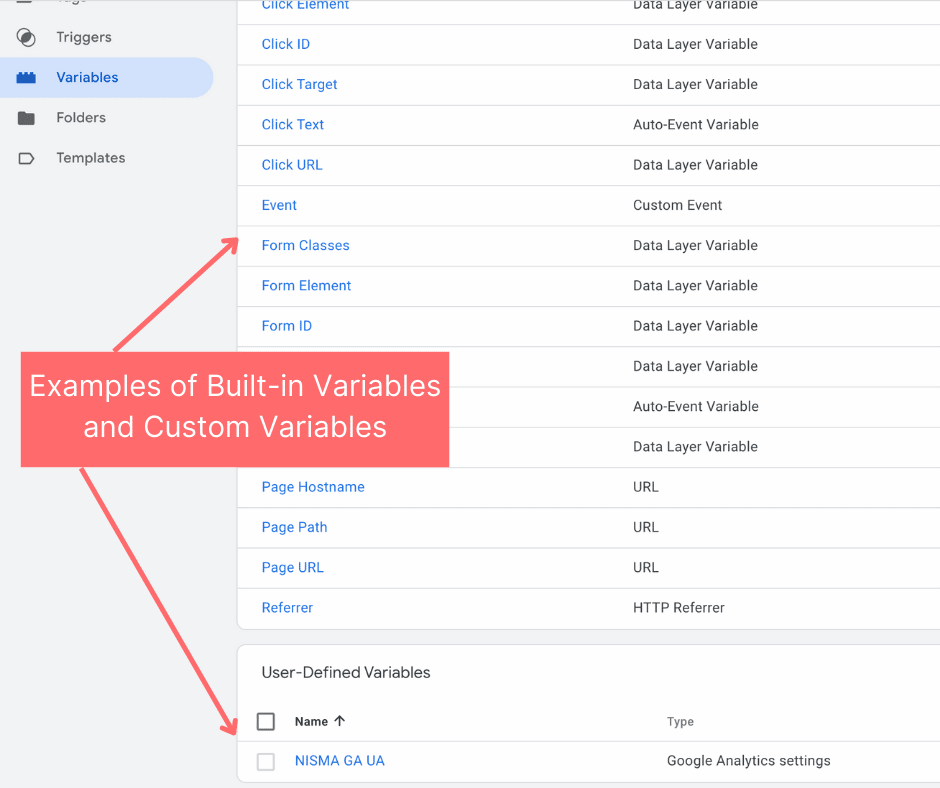
Variables
A ‘Variable’ refers to additional information that Google Tag Manager may need for the tag and trigger to work effectively. A variable refers to data that may change e.g. a price, product name or a date, etc.
Tag Manager offers many built in variables already set up. But you can also customise these to more precisely fit what you want to track. For example, the built-in variable “url” contains the address of the currently loaded page.
However, if you want the tag to only fire on the page test.co.uk/checkout/order-recieved.html, then you would create a trigger with the following settings:
Event: Page View
Trigger Type: Page View
Fire On: Some Page Views
Fire the tag when these conditions are met:
URL contains test.co.uk/checkout/order-recieved.html
Now that you have an understanding of the main basic elements which make up Google Tag Manager, how do you actually set it up for your business?
How to Set up Google Tag Manager: A Step by Step Guide
It is very simple to set up a new account, just go to Google Tag Manager and click the ‘Create Account’ button to get started. Next you will be asked to input some information including your account name, country and website URL and you will also be able to select where you want to use Google Tag Manager e.g. Web, Android, AMP, IOS. Once this information has been input, select the blue ‘create’ button.
In the next screen you will be given some code that will need to be inserted onto your website in order to begin creating tags. Follow the instructions provided by Google Tag Manager to input one code into the <head> section of your website and the other after the opening <body> tag. We recommend that you do this immediately, however, it is possible to come back and do this at a later stage.
Congratulations, you now have a Google Tag Manager Account! So, how do you utilise it?
Configure Variables
The first step you’ll want to take is configuring your variables. As mentioned previously Google Tag Manager comes with pre-built Variables. In order to utilise these you will need to select ‘Variables’ from the left side menu, and then select the ‘Configure’ button on the top right of the page.
This will pull out a menu of the pre- built variables which you can use on the account. Simply select by ticking the box beside each variable you want to include.
Depending on what you want to track, you can decide which variables suit your requirements best. Once selected the variable will automatically appear in the ‘Built-in Variables’ section of your Google Tag Manager and you will be able to view them once you click away from the pop out menu.
Defining Triggers
Once you have defined your variables, you can begin creating triggers. Triggers allow you to define the specific conditions under which tags will fire. Therefore, you must first create a trigger before being able to create a tag.
To create a trigger:
- Click on the ‘Trigger’ section from the left menu bar in GTM.
- Click ‘Trigger Configuration’
- Select the Trigger type that you would like to create
- Then complete the setup and submit your changes to make them live
When defining a trigger it can be helpful to make use of GTM’s ‘preview mode’ if you want to track a more specific event. For example if you want to track form submissions on a particular form on your website, you can use ‘preview mode’ to follow a customer’s journey across your website and using the information which is tracked by GTM you can set up relevant triggers. By clicking on the form that you want to track, GTM preview mode will provide you with information on that button or landing page, which you can use to more accurately set up a specific trigger for that form. Simply choose a defining piece of data for use in your trigger e.g. page path, unique button text or URL. Then when setting up a ‘Form Submission’ trigger you can choose ‘some forms’ instead of the generic ‘all forms’ and input the defining piece of data that you have pinpointed to allow you to more accurately track that particular form.
Set up a Tag
You can create an endless number of tags for tracking absolutely anything you want to across your website or app. However we highly recommend that you label them accurately within your account to make it easier for you to keep track and organise. Google recommends this naming convention: tag type – name of app – detail. An example of this would be: GA4 – Click – Buy Now Button. Including the detail of the ‘Buy Now Button’ is important as you may be tracking various clicks across the website so it can be hard to differentiate between tags if you named them all generically.
To create a new tag click the “Add a New Tag” button on the main dashboard area of Google Tag Manager. Enter your title in the top left corner and then click on the “Tag Configuration” box to continue. Select the ‘Tag Type’ that you want to create from the pop out list, there are many pre-built or you can custom create one to suit your needs. Say for example you selected “Google Analytics: GA4 Configuration”, you will then be asked to input your Measurement ID from your GA4 account.
Once this has been inserted, you can then click on the “Triggering” box to choose a trigger to determine when the tag is fired. You might choose to select “All Pages” this means that your tag will record every time a person views one of your webpages. Once you are content with the information you have input into the “Tag Configuration” box and “Triggering” box, you can click “save” to continue. You must then click the “submit” button to be brought to the “submission configuration” page and then select “Submit” to make your changes live and start gathering information from your tag. After this the “Container Version Description” box will appear and give you the opportunity to organise your tags by inputting a more detailed description of what you are measuring, click “continue” once you are happy with your descriptions. That’s your first Tag set up completed!
You can go more in depth in relation to tracking your tags and use GA4 or Universal Analytics alongside Google Tag Manager for more in depth tracking. Check out our other blogs for more information on how to set this up.
If you’re now an expert in Google Tag Manager congratulations! But if you feel like you need a little extra help then scroll down to contact our team at D24 for a GTM training session.